Monday, August 11, 2014

Device and Operating system statics report( What is Android & iPhone postition)

Hello,
I have only two things to show you, what i got from past one month.
It is just incredible result of android growing market as per device and the operating system statics.  here the first image:
Realtime Web Analytics With no Sampling
(Mobile/Tablet Operating System Market Share)


Suhan Gorya Statics on Mobile operating system.
This is showing the clear information of all the statics of currently installed device with the following percentage of presence in world market.

Now her the another image:
Suhan Gorya statics report on mobile operating system version.
This is showing the report of android and all the operating system present in devices.
all the data and statics from the online calculation of device managers.

Thank You.
Suhan Gorya

Friday, June 20, 2014

Do You Know Why KitKat 4.4 Smart, simple, and truly yours? Check With Suhan Gorya.

Hello EveryOne

After so long, i am writing about the android kitkat version, the sweater it is, sweat in taste as well. I just having research on the Android 4.4.4 version release, i found something best in the kitkat. the sources of the content(http://www.android.com) slightly clear that, why the android have their on value.

Latest Check with me, why it is???

Beautiful & Immersive

A more polished design, improved performance, and new features.

Just say “Ok Google”

You don’t need to touch the screen to get things done. When on your home screen* or in Google Now, just say “Ok Google” to launch voice search, send a text, get directions or even play a song.

A work of art

While listening to music on your device, or while projecting movies to Chromecast, you’ll see beautiful full-screen album and movie art when your device is locked. You can play, pause, or seek to a specific moment.

Immerse yourself

The book you're reading, the game you're playing, or the movie you're watching — now all of these take center stage with the new immersive mode, which automatically hides everything except what you really want to see. Just swipe the edge of the screen to bring back your status bar and navigation buttons.

Faster multitasking

Android 4.4 takes system performance to an all-time high by optimizing memory and improving your touchscreen so that it responds faster and more accurately than ever before. This means that you can listen to music while browsing the web, or race down the highway with the latest hit game, all without a hitch.

Smart & Simple

Google smarts improve every corner of the Android experience.

The future is calling

The new phone app automatically prioritizes your contacts based on the people you talk to the most. You can also search for nearby places and businesses, your contacts, or people in your Google Apps domain.

A smarter caller ID

Whenever you get a call from a phone number not in your contacts, your phone will look for matches from businesses with a local listing on Google Maps.

All your messages in the same place

Never miss a message, no matter how your friend sends it. With the new Hangouts app, all of your SMS and MMS messages are together in the same app, alongside your other conversations and video calls. And with the new Hangouts, you can even share your location and send animated GIFs.

Emoji everywhere

Sometimes words can’t express how you feel. For that, there’s Emoji, the colorful Japanese characters, now available on Google Keyboard.

Grab & Go

New features help you get things done while you’re on the move.

Print wherever, whenever

Now you can print photos, documents, and web pages from your phone or tablet. You can print to any printer connected to Google Cloud Print, to HP ePrint printers, and to other printers that have apps in the Google Play Store.

Pick a file, any file

From apps like Quickoffice, you can open and save files on Google Drive, other cloud storage services, or your device. And with quick access to recently used files, it's easier than ever to send the file you were just working on.

Your office, anywhere

Create and edit documents, spreadsheets and presentations from your phone or tablet with the newly redesigned Quickoffice

Even more features

For those of you looking to go deeper, here's an exhaustive list of all the updates found in Android 4.4, KitKat.
Check them out  


*Currently only available on Nexus 5

All Sources for the post from GOOGLE Official website for Android.


So wait for the next secret of Android Kitkat 4.4.4
for more information check Makers Of Android

Suhan Gorya

Tuesday, June 17, 2014

Soccer Score: FootBall WorldCup Android App by Suhan Gorya

Check the latest Android application by Suhan Gorya for all the soccer lovers,
To get the application from amazon app store Link

Live Feed.
Highlights of Fifa World cup
best footballer score
best shots
all the top listed games
and many more.
For More information check the home page MakersOfAndroid


Suhan Gorya

Tuesday, May 13, 2014

Video`s HD: Singer (Android Application by Suhan Gorya)

Hello,
This time with new work development news.

Video`s HD: Singer

I just built new android application for each and every single music lovers. It provide 40 top artist from the world.This application listed on Amazon in category of  "Best free app of the day".
here some features of this application:

Video`s HD offers the largest collection of premium official music videos. Start watching your favorite music videos and catch daily video premieres by downloading Video`s HD for Android today.
Discover exciting new music videos, original shows, and live music performances from your favorite artists.
Stream live music performances, and discover new songs from your favorite artists.
Sit back and relax with Video`s HD TV, a hand-curated music video channel. Turn it on and enjoy an HD music experience that features everything from daily premieres to live music to the best classics.
Enjoy pop, rap, rock, R&B, electronic, country, and much more – the HD music video choices are endless on Video`s HD.
Video`s HD will work over cellular (3G or LTE) network connections, but for the highest quality music video experience, we suggest accessing via Wi-Fi whenever possible.

PLEASE NOTE: Due to the nature of some licenses from the content owners, features and videos may not be available in all regions.
Imagine a lifetime’s worth of music, on all your favorite Android® devices, available anywhere. Really.

Create the music experience you want with easy, full-featured, personalized listening. Build a library, browse channels, and make and share playlists. Stream the latest tracks from the major labels and the indies to your Android mobile.
you can download from here link.


Wish you will like and also make good review. i am here for sharing each update with you.


Suhan Gorya

Thursday, March 27, 2014

Get Started with the Developer Preview By Suhan Gorya

 This is New Android from developer.android

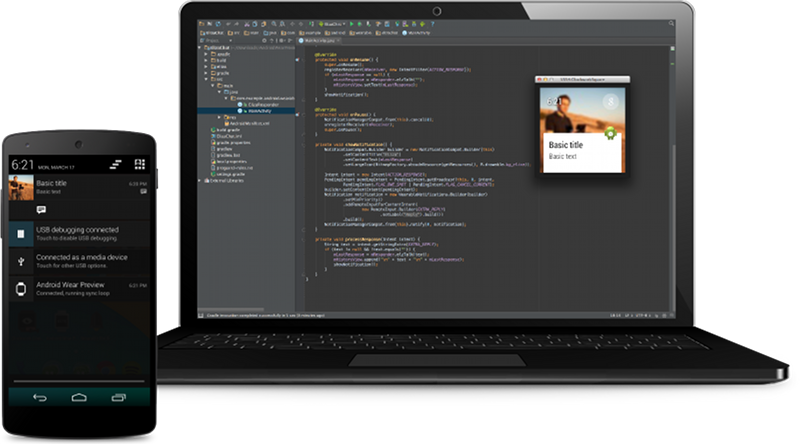
The Android Wear Developer Preview includes tools and APIs that allow you to enhance your app notifications to provide an optimized user experience on Android wearables.
With the Android Wear Developer Preview, you can:
  • Run the Android Wear platform in the Android emulator.
  • Connect your Android device to the emulator and view notifications from the device as cards on Android Wear.
  • Try new APIs in the preview support library that enhance your app's notifications with features such as voice replies and notification pages.
To get access to the Developer Preview tools, click the sign up button on the right, then follow the setup instructions below.
Sign Up for the Developer Preview
Signing up provides you access to:
  • New notification APIs in the preview support library.
  • Sample apps using the new notification APIs.
  • The Android Wear Preview app for your mobile device, which connects your device to the Android Wear emulator.
Caution: The current Android Wear Developer Preview is intended for development and testing purposes only, not for production apps. Google may change this Developer Preview significantly prior to the official release of the Android Wear SDK. You may not publicly distribute or ship any application using this Developer Preview, as this Developer Preview will no longer be supported after the official SDK is released (which will cause applications based only on the Developer Preview to break).

Prerequisites


Before you begin the setup, you must:
  1. Install the Android SDK.
    The Android SDK includes all the developer tools required to build apps for Android (optional IDEs are also available for download).
  2. Sign up for the Android Wear Developer Preview.
    You must sign up with a Gmail or other Google account in order to download the preview support library and receive access to the Android Wear Preview beta app on Google Play Store.
Note: If you're using the ADT plugin for Eclipse, you must update to version 22.6.1 or higher. If you're using Android Studio, you must update to version 0.5.1 or higher

1. Install the Android Wear System Image


  1. Launch Android SDK Manager.
    • From Eclipse, select Window > Android SDK Manager.
    • From Android Studio, select Tools > Android > SDK Manager.
  2. Below Tools, verify that you have Android SDK Tools revision 22.6 or higher.
    If your version of Android SDK Tools is lower than 22.6, you must update:
    1. Select Android SDK Tools.
    2. Click Install package.
    3. Accept the license and click Install.
    4. When the installation completes, restart Android SDK Manager.
  3. Below Android 4.4.2, select Android Wear ARM EABI v7a System Image.
    Note: Android Wear is designed to support multiple processor architectures.
  4. Below Extras, ensure that you have the latest version of the Android Support Library. If an update is available, select Android Support Library. If you're using Android Studio, also select Android Support Repository.
  5. Click Install packages.
  6. Accept the license and click Install.

2. Set Up the Android Wear Emulator


  1. Launch the Android Virtual Device Manager.
    • From Eclipse, select Window > Android Virtual Device Manager.
    • From Android Studio, select Tools > Android > AVD Manager.
  2. Click New.
  3. For the AVD Name, enter "AndroidWearSquare" or "AndroidWearRound", depending on whether you want to create an emulator with a square or round display.
  4. For the Device, select Android Wear Square or Android Wear Round.
  5. For the Target, select Android 4.4.2 - API Level 19 (or higher).
  6. For the CPU/ABI, select Android Wear ARM (armeabi-v7a).
    Note: Android Wear is designed to support multiple processor architectures.
  7. For the Skin, select AndroidWearSquare or AndroidWearRound.
  8. Leave all other options set to their defaults and click OK.
    Although real Android wearables do not provide a keyboard as an input method, you should keep Hardware keyboard present selected so you can provide text input on screens where users will instead provide voice input.
  9. In the list of AVDs, select the one you just created and click Start. In the following window, click Launch.
The Android Wear emulator now starts. To begin testing your app's notifications, you must now pair the emulator to your development device that has the Android Wear Preview app installed.
Tip: To improve the emulator startup time, edit your AVD and enable Snapshot under Emulator Options. When you start the emulator, select Save to snapshot then click Launch. Once the emulator is running, close it to save a snapshot of the system. Start the AVD again, but select Launch from snapshot and deselect Save to snapshot.
Caution: Do not install apps on the Android Wear emulator. The system does not support traditional Android apps and the result of running such apps is unpredictable.

3. Set Up the Android Wear Preview App


To view your app's notifications on the Android Wear emulator, you must have the Android Wear Preview app installed on your Android device (a phone or tablet).
To receive the Android Wear Preview app, you must sign up for the Developer Preview using the same Gmail or Google account you use with Google Play Store.

Note: The Android Wear Preview app is compatible with Android 4.3 and higher and is not available for the Android emulator.
After you've signed up for the Developer Preview, you'll receive a confirmation email that includes a link to opt-in to the Android Wear Preview app beta program. Once you opt-in, it may take up to 24 hours for the app to become available in Google Play Store.
After you install the Android Wear Preview app, you can set up your device to communicate with the Android Wear emulator:
  1. Open the Android Wear Preview app. You should see a notice that the app is currently not enabled as a notification listener. Tap the message to open the system settings, then select Android Wear Preview to grant it notification access.
  2. Connect your device to your development machine over USB. Be sure that no other Android devices are connected to the machine.
  3. Ensure that the Android Wear emulator (created in the previous section) is running. The emulator should show the time and an icon that indicates no device is connected.
  4. Open a command line terminal, navigate to your Android SDK's platform-tools/ directory, then execute:
    adb -d forward tcp:5601 tcp:5601
    Note: You must execute this command each time you connect your device over USB.
  5. Return to the Android Wear Preview app. It should now indicate that it is connected to the emulator. The Android Wear emulator should now show the 'g' orb icon, indicating that is is connected to your device.
Now, notifications from your device also appear in the Android Wear emulator.

4. Add the Support Library to Your Project


The Android Wear preview support library includes several APIs that allow you to optimize your app's notifications for the Android Wear user experience.
To receive the preview support library, you must sign up for the Developer Preview. The confirmation email you receive after you sign up includes a link to download a ZIP file, which contains the preview support library and some sample apps.
After you download and unzip the package, add the preview support library sto your Android project:
If you're using Eclipse:
  1. In your Android app project, create a libs/ directory in your project root (the same location as theAndroidManifest.xml file).
  2. Copy the v4 support library JAR file from your Android SDK directory (e.g.,<sdk>/extras/android/support/v4/android-support-v4.jar) into your project libs/ directory.
  3. Also save the wearable-preview-support.jar file in the libs/ directory.
  4. Right click each JAR file and select Build Path > Add to Build Path.
If you're using Android Studio:
  1. In your Android app project, create a libs/ directory in your project root (the same location as theAndroidManifest.xml file).
  2. Save the wearable-preview-support.jar file in the libs/ directory.
  3. Open the build.gradle file in your app module.
  4. Add a dependency rule for both the v4 support library and the Android Wear preview support library:
    dependencies {
        compile "com.android.support:support-v4:18.0.+"
        compile files('../libs/wearable-preview-support.jar')
    }
  5. Click Sync Project with Gradle Files in the toolbar.
To start optimizing your notifications for Android Wear, read Creating Notifications for Android Wear.

Saturday, March 15, 2014

Connecting Android with MySQL(Remote Database) PHP and JSON code by Suhan Gorya

Let`s talk about old technique, with new start.
MySQL with sever details, After Long time, on blogger. I find something new, let`s write about MYSQL database.
In this we will call a PHP script to perform basic CRUD(Create, Read, Update, Delete) operations. To brief you on the architecture, it works. your android app calls First a PHP script in order to perform a data operation, lets say “Create”. Then PHP script connects to MySQL database to perform the operation.
So it start data flows from your Android app to PHP script then finally is stored in MySQL database.

 Let`s first we need to discuss over something new for android developer.

What is WAMP Server

WAMP is acronym for Windows, Apache, MySQL and PHP, Perl, Python. WAMP software is one click installer which creates an environment for developing PHP, MySQL web application. By installing this software you will be installing Apache, MySQL and PHP. Alternatively you can use XAMP Server also.

Way to Installing and Running WAMP Server

Download & Install WAMP server from www.wampserver.com/en/. Once you have installed wamp server,
start the program from Start -> All Programs -> WampServer -> StartWampServer.
You can test your server by opening the address http://localhost/ in your browser.
Also you can check phpmyadmin by opening http://localhost/phpmyadmin

Start Creating and Running PHP Project

Now you have the environment ready to develop a PHP & MySQL project. Go to the location where you installed WAMP server (In my case i installed in C:\wamp\) and go to www folder and create a new folder for your project. You have to place all your project files inside this folder.
Create a folder called Makersofandroid and create a new php file called test.php and try out simple php code. After placing following code try to open http://localhost/android_connect/test.php and you should see a message called “Welcome, I am connecting Android to PHP, MySQL“.

makersofandroid.php
"<?php
    echo "Welcome makersofandroid, I am connecting Android to PHP, MySQL";
?>"


4. Creating MySQL Database and Tables

In this tutorial i am creating a simple database with one table. Through out this tutorial i am using same table to perform example operations. Now open phpmyadmin by opening the address http://localhost/phpmyadmin/ in your browser. You can use the PhpMyAdmin tool to create a database and a table.
I am creating a database named makersofandroid and a table called products.
CREATE DATABASE makersofandroid;
CREATE TABLE makersofandroid(
pid int(11) primary key auto_increment,
name varchar(100) not null,
price decimal(10,2) not null,
description text,
created_at timestamp default now(),
updated_at timestamp
);


Now Connecting to MySQL database using PHP Script.

Here, the code start for Create a PHP class to connect to MySQL database. The main purpose of this class is to open a connection to database and close the connection whenever its not needed. So create two files called db_config.php and db_connect.php
db_config.php – will have database connection variables
db_connect.php – a class file to connect to database
Following is code for two php files
db_config.php
db_config.php
<?php
 
/*
 * All database connection variables
 */
 
define('DB_USER', "root"); // db user
define('DB_PASSWORD', ""); // db password (mention your db password here)
define('DB_DATABASE', "makersofandroid"); // database name
define('DB_SERVER', "localhost"); // db server
?>
db_connect.php
db_connect.php
<?php

/**
 * A class file to connect to database
 */
class DB_CONNECT {

    // constructor
    function __construct() {
        // connecting to database
        $this->connect();
    }

    // destructor
    function __destruct() {
        // closing db connection
        $this->close();
    }

    /**
     * Function to connect with database
     */
    function connect() {
        // import database connection variables
        require_once __DIR__ . '/db_config.php';

        // Connecting to mysql database
        $con = mysql_connect(DB_SERVER, DB_USER, DB_PASSWORD) or die(mysql_error());

        // Selecing database
        $db = mysql_select_db(DB_DATABASE) or die(mysql_error()) or die(mysql_error());

        // returing connection cursor
        return $con;
    }

    /**
     * Function to close db connection
     */
    function close() {
        // closing db connection
        mysql_close();
    }

}

?>

you want to connect to MySQL database and do some operations use the db_connect.php class
$db = new DB_CONNECT(); // creating class object

Here is Basic MySQL CRUD Operations using PHP

In this tutorial basic CRUD (Create, Read, Update, Delete) operations on MySQL database using PHP.

Learn How to Creating a row in MySQL (Creating a new product)

In your PHP project create a new php file called create_product.php and place the following code. This file is mainly for creating a new product in products table.
 in this code data read via POST and storing them in products table.
create_product.php
<?php
 
/*
 * Following code will create a new product row
 * All product details are read from HTTP Post Request
 */
 
// array for JSON response
$response = array();
 
// check for required fields
if (isset($_POST['name']) && isset($_POST['price']) && isset($_POST['description'])) {
 
    $name = $_POST['name'];
    $price = $_POST['price'];
    $description = $_POST['description'];
 
    // include db connect class
    require_once __DIR__ . '/db_connect.php';
 
    // connecting to db
    $db = new DB_CONNECT();
 
    // mysql inserting a new row
    $result = mysql_query("INSERT INTO products(name, price, description) VALUES('$name', '$price', '$description')");
 
    // check if row inserted or not
    if ($result) {
        // successfully inserted into database
        $response["success"] = 1;
        $response["message"] = "Product successfully created.";
 
        // echoing JSON response
        echo json_encode($response);
    } else {
        // failed to insert row
        $response["success"] = 0;
        $response["message"] = "Oops! An error occurred.";
 
        // echoing JSON response
        echo json_encode($response);
    }
} else {
    // required field is missing
    $response["success"] = 0;
    $response["message"] = "Required field(s) is missing";
 
    // echoing JSON response
    echo json_encode($response);
}
?>
 
For the above code JSON response will be
When POST param(s) is missing
{
    "success": 0,
    "message": "Required field(s) is missing"
}
When product is successfully created
{
    "success": 1,
    "message": "Product successfully created."
}
When error occurred while inserting data
{
    "success": 0,
    "message": "Oops! An error occurred."
}

Learn to Reading a Row from MySQL (Reading product details)

Create a new php file called get_product_details.php and write the following code. This file will get single product details by taking product id (pid) as post parameter.
get_product_details.php
<?php
 
/*
 * Following code will get single product details
 * A product is identified by product id (pid)
 */
 
// array for JSON response
$response = array();
 
// include db connect class
require_once __DIR__ . '/db_connect.php';
 
// connecting to db
$db = new DB_CONNECT();
 
// check for post data
if (isset($_GET["pid"])) {
    $pid = $_GET['pid'];
 
    // get a product from products table
    $result = mysql_query("SELECT *FROM products WHERE pid = $pid");
 
    if (!empty($result)) {
        // check for empty result
        if (mysql_num_rows($result) > 0) {
 
            $result = mysql_fetch_array($result);
 
            $product = array();
            $product["pid"] = $result["pid"];
            $product["name"] = $result["name"];
            $product["price"] = $result["price"];
            $product["description"] = $result["description"];
            $product["created_at"] = $result["created_at"];
            $product["updated_at"] = $result["updated_at"];
            // success
            $response["success"] = 1;
 
            // user node
            $response["product"] = array();
 
            array_push($response["product"], $product);
 
            // echoing JSON response
            echo json_encode($response);
        } else {
            // no product found
            $response["success"] = 0;
            $response["message"] = "No product found";
 
            // echo no users JSON
            echo json_encode($response);
        }
    } else {
        // no product found
        $response["success"] = 0;
        $response["message"] = "No product found";
 
        // echo no users JSON
        echo json_encode($response);
    }
} else {
    // required field is missing
    $response["success"] = 0;
    $response["message"] = "Required field(s) is missing";
 
    // echoing JSON response
    echo json_encode($response);
}
?>
The json response for the above file will be
When successfully getting product details
{
    "success": 1,
    "product": [
        {
            "pid": "1",
            "name": "iPHone 4S",
            "price": "300.00",
            "description": "iPhone 4S white",
            "created_at": "2012-04-29 01:41:42",
            "updated_at": "0000-00-00 00:00:00"
        }
    ]
}
When no product found with matched pid
{
    "success": 0,
    "message": "No product found"
}

Learn to Reading All Rows from MySQL (Reading all products)

We need a json to list all the products on android device. So create a new php file named get_all_products.php and write following code.
get_all_products.php
<?php
 
/*
 * Following code will list all the products
 */
 
// array for JSON response
$response = array();
 
// include db connect class
require_once __DIR__ . '/db_connect.php';
 
// connecting to db
$db = new DB_CONNECT();
 
// get all products from products table
$result = mysql_query("SELECT *FROM products") or die(mysql_error());
 
// check for empty result
if (mysql_num_rows($result) > 0) {
    // looping through all results
    // products node
    $response["products"] = array();
 
    while ($row = mysql_fetch_array($result)) {
        // temp user array
        $product = array();
        $product["pid"] = $row["pid"];
        $product["name"] = $row["name"];
        $product["price"] = $row["price"];
        $product["created_at"] = $row["created_at"];
        $product["updated_at"] = $row["updated_at"];
 
        // push single product into final response array
        array_push($response["products"], $product);
    }
    // success
    $response["success"] = 1;
 
    // echoing JSON response
    echo json_encode($response);
} else {
    // no products found
    $response["success"] = 0;
    $response["message"] = "No products found";
 
    // echo no users JSON
    echo json_encode($response);
}
?>
And the JSON response for above code
Listing all Products
{"products":[{"pid":"1",
"name":"KFC",
"price":"10.00",
"description":"good",
"created_at":"2014-03-13 00:00:00",
"updated_at":"2014-03-14 00:00:00"}],
"success":1}
When products not found
{
    "success": 0,
    "message": "No products found"
}

Learn to Updating a Row in MySQL (Updating product details)

Create a php file named update_product.php to update product details. Each product is identified by pid.
update_product.php
<?php
 
/*
 * Following code will update a product information
 * A product is identified by product id (pid)
 */
 
// array for JSON response
$response = array();
 
// check for required fields
if (isset($_POST['pid']) && isset($_POST['name']) && isset($_POST['price']) && isset($_POST['description'])) {
 
    $pid = $_POST['pid'];
    $name = $_POST['name'];
    $price = $_POST['price'];
    $description = $_POST['description'];
 
    // include db connect class
    require_once __DIR__ . '/db_connect.php';
 
    // connecting to db
    $db = new DB_CONNECT();
 
    // mysql update row with matched pid
    $result = mysql_query("UPDATE products SET name = '$name', price = '$price', description = '$description' WHERE pid = $pid");
 
    // check if row inserted or not
    if ($result) {
        // successfully updated
        $response["success"] = 1;
        $response["message"] = "Product successfully updated.";
 
        // echoing JSON response
        echo json_encode($response);
    } else {
 
    }
} else {
    // required field is missing
    $response["success"] = 0;
    $response["message"] = "Required field(s) is missing";
 
    // echoing JSON response
    echo json_encode($response);
}
?>
The json reponse of above code, when product is updated successfully
{
    "success": 1,
    "message": "Product successfully updated."
}

Learn to Deleting a Row in MySQL (Deleting a product)

The last operation is deletion on database. Create a new php file called delete_product.php and paste the following code. The main functionality of this file is to delete a product from database.
delete_product.php
<?php
 
/*
 * Following code will delete a product from table
 * A product is identified by product id (pid)
 */
 
// array for JSON response
$response = array();
 
// check for required fields
if (isset($_POST['pid'])) {
    $pid = $_POST['pid'];
 
    // include db connect class
    require_once __DIR__ . '/db_connect.php';
 
    // connecting to db
    $db = new DB_CONNECT();
 
    // mysql update row with matched pid
    $result = mysql_query("DELETE FROM products WHERE pid = $pid");
 
    // check if row deleted or not
    if (mysql_affected_rows() > 0) {
        // successfully updated
        $response["success"] = 1;
        $response["message"] = "Product successfully deleted";
 
        // echoing JSON response
        echo json_encode($response);
    } else {
        // no product found
        $response["success"] = 0;
        $response["message"] = "No product found";
 
        // echo no users JSON
        echo json_encode($response);
    }
} else {
    // required field is missing
    $response["success"] = 0;
    $response["message"] = "Required field(s) is missing";
 
    // echoing JSON response
    echo json_encode($response);
}
?>
When product successfully deleted
{
    "success": 1,
    "message": "Product successfully deleted"
}
When product not found
{
    "success": 0,
    "message": "No product found"
}
Until now, we built a simple api for our products table. We are now done with the server side coding (PHP) and its time to take a break and start our actual android application coding.

Here we come with android.

Creating Android Application

Create a new project in your Eclipse IDE by filling the required details.
1. Create new project in Eclipse IDE by going to File ⇒ New ⇒ Android Project and name the Activity class name as MainScreenActivity.
2. Open your AndroidManifest.xml file and add following code. First  adding all the classes & creating to manifest file. Also adding INTERNET Connect permission.
AndroidManifest.xml
<?xml version="1.0" encoding="utf-8"?>
    package="suhan.gorya.makersofandroid"
    android:versionCode="1"
    android:versionName="1.0" >
 
    <uses-sdk android:minSdkVersion="8" />
 
    <application
        android:configChanges="keyboardHidden|orientation"
        android:icon="@drawable/ic_launcher"
        android:label="@string/app_name" >
 
        <activity
            android:name=".MainScreenActivity"
            android:label="@string/app_name" >
            <intent-filter>
                <action android:name="android.intent.action.MAIN" />
 
                <category android:name="android.intent.category.LAUNCHER" />
            </intent-filter>
        </activity>
 
        <!-- All Product Activity -->
        <activity
            android:name=".AllProductsActivity"
            android:label="All Products" >
        </activity>
 
        <!-- Add Product Activity -->
        <activity
            android:name=".NewProductActivity"
            android:label="Add New Product" >
        </activity>
 
        <!-- Edit Product Activity -->
        <activity
            android:name=".EditProductActivity"
            android:label="Edit Product" >
        </activity>
    </application>
 
    <!--  Internet Permissions -->
    <uses-permission android:name="android.permission.INTERNET" />
 
</manifest>
3. Now create a new xml file under res ⇒ layout folder and name it as main_screen.xml This layout file contains two simple buttons to view all products and add a new product.
main_screen.xml
<?xml version="1.0" encoding="utf-8"?>
<LinearLayout xmlns:android="http://schemas.android.com/apk/res/android"
    android:layout_width="fill_parent"
    android:layout_height="fill_parent"
    android:orientation="vertical"
    android:gravity="center_horizontal">
 
    <!--  Sample Dashboard screen with Two buttons -->
    <!--  Button to view all products screen -->
    <Button android:id="@+id/btnViewProducts"
        android:layout_width="fill_parent"
        android:layout_height="wrap_content"
        android:text="View Products"
        android:layout_marginTop="25dip"/>
 
    <!--  Button to create a new product screen -->
    <Button android:id="@+id/btnCreateProduct"
        android:layout_width="fill_parent"
        android:layout_height="wrap_content"
        android:text="Add New Products"
        android:layout_marginTop="25dip"/>
 
</LinearLayout>
 
4. Open you main activity class which is MainScreenActivity.java and write click events for two button which are mentioned in main_screen.xml layout.
MainScreenActivity.java
package suhan.gorya.makersofandroid;
 
import android.app.Activity;
import android.content.Intent;
import android.os.Bundle;
import android.view.View;
import android.widget.Button;
 
public class MainScreenActivity extends Activity{
 
    Button btnViewProducts;
    Button btnNewProduct;
 
    @Override
    public void onCreate(Bundle savedInstanceState) {
        super.onCreate(savedInstanceState);
        setContentView(R.layout.main_screen);
 
        // Buttons
        btnViewProducts = (Button) findViewById(R.id.btnViewProducts);
        btnNewProduct = (Button) findViewById(R.id.btnCreateProduct);
 
        // view products click event
        btnViewProducts.setOnClickListener(new View.OnClickListener() {
 
            @Override
            public void onClick(View view) {
                // Launching All products Activity
                Intent i = new Intent(getApplicationContext(), AllProductsActivity.class);
                startActivity(i);
 
            }
        });
 
        // view products click event
        btnNewProduct.setOnClickListener(new View.OnClickListener() {
 
            @Override
            public void onClick(View view) {
                // Launching create new product activity
                Intent i = new Intent(getApplicationContext(), NewProductActivity.class);
                startActivity(i);
 
            }
        });
    }
}

Displaying All Products in ListView (Read)

5. Now we need an Activity display all the products in list view format. As we know list view needs two xml files, one for listview and other is for single list row. Create two xml files under res ⇒ layout folder and name it as all_products.xml and list_item.xml
all_products.xml
all_products.xml
<?xml version="1.0" encoding="utf-8"?>
<LinearLayout xmlns:android="http://schemas.android.com/apk/res/android"
    android:layout_width="fill_parent"
    android:layout_height="fill_parent"
    android:orientation="vertical">
    <!-- Main ListView
         Always give id value as list(@android:id/list)
    -->
    <ListView
        android:id="@android:id/list"
        android:layout_width="fill_parent"
        android:layout_height="wrap_content"/>
 
</LinearLayout>
list_item.xml
list_item.xml
<?xml version="1.0" encoding="utf-8"?>
<LinearLayout xmlns:android="http://schemas.android.com/apk/res/android"
    android:layout_width="fill_parent"
    android:layout_height="wrap_content"
    android:orientation="vertical" >
 
    <!-- Product id (pid) - will be HIDDEN - used to pass to other activity -->
    <TextView
        android:id="@+id/pid"
        android:layout_width="fill_parent"
        android:layout_height="wrap_content"
        android:visibility="gone" />
 
    <!-- Name Label -->
    <TextView
        android:id="@+id/name"
        android:layout_width="fill_parent"
        android:layout_height="wrap_content"
        android:paddingTop="6dip"
        android:paddingLeft="6dip"
        android:textSize="17dip"
        android:textStyle="bold" />
 
</LinearLayout>
6. Create a new class file and name it as AllProductsActivity.java. In the following code
-> First a request is send to get_all_products.php file using a Background Async task thread.
-> After getting JSON from get_all_products.php, i parsed it and displayed in a listview.
-> If there are no products found AddNewProductAcivity is launched.
AllProductsActivity.java
package suhan.gorya.makersofandroid;
 
import java.util.ArrayList;
import java.util.HashMap;
import java.util.List;
 
import org.apache.http.NameValuePair;
import org.json.JSONArray;
import org.json.JSONException;
import org.json.JSONObject;
 
import android.app.ListActivity;
import android.app.ProgressDialog;
import android.content.Intent;
import android.os.AsyncTask;
import android.os.Bundle;
import android.util.Log;
import android.view.View;
import android.widget.AdapterView;
import android.widget.AdapterView.OnItemClickListener;
import android.widget.ListAdapter;
import android.widget.ListView;
import android.widget.SimpleAdapter;
import android.widget.TextView;
 
public class AllProductsActivity extends ListActivity {
 
    // Progress Dialog
    private ProgressDialog pDialog;
 
    // Creating JSON Parser object
    JSONParser jParser = new JSONParser();
 
    ArrayList<HashMap<String, String>> productsList;
 
    // url to get all products list
    private static String url_all_products = "http://suhan.gorya/makersofandroid/get_all_products.php";
 // you can find it on local server.
    // JSON Node names
    private static final String TAG_SUCCESS = "success";
    private static final String TAG_PRODUCTS = "products";
    private static final String TAG_PID = "pid";
    private static final String TAG_NAME = "name";
 
    // products JSONArray
    JSONArray products = null;
 
    @Override
    public void onCreate(Bundle savedInstanceState) {
        super.onCreate(savedInstanceState);
        setContentView(R.layout.all_products);
 
        // Hashmap for ListView
        productsList = new ArrayList<HashMap<String, String>>();
 
        // Loading products in Background Thread
        new LoadAllProducts().execute();
 
        // Get listview
        ListView lv = getListView();
 
        // on seleting single product
        // launching Edit Product Screen
        lv.setOnItemClickListener(new OnItemClickListener() {
 
            @Override
            public void onItemClick(AdapterView<?> parent, View view,
                    int position, long id) {
                // getting values from selected ListItem
                String pid = ((TextView) view.findViewById(R.id.pid)).getText()
                        .toString();
 
                // Starting new intent
                Intent in = new Intent(getApplicationContext(),
                        EditProductActivity.class);
                // sending pid to next activity
                in.putExtra(TAG_PID, pid);
 
                // starting new activity and expecting some response back
                startActivityForResult(in, 100);
            }
        });
 
    }
 
    // Response from Edit Product Activity
    @Override
    protected void onActivityResult(int requestCode, int resultCode, Intent data) {
        super.onActivityResult(requestCode, resultCode, data);
        // if result code 100
        if (resultCode == 100) {
            // if result code 100 is received
            // means user edited/deleted product
            // reload this screen again
            Intent intent = getIntent();
            finish();
            startActivity(intent);
        }
 
    }
 
    /**
     * Background Async Task to Load all product by making HTTP Request
     * */
    class LoadAllProducts extends AsyncTask<String, String, String> {
 
        /**
         * Before starting background thread Show Progress Dialog
         * */
        @Override
        protected void onPreExecute() {
            super.onPreExecute();
            pDialog = new ProgressDialog(AllProductsActivity.this);
            pDialog.setMessage("Loading products. Please wait...");
            pDialog.setIndeterminate(false);
            pDialog.setCancelable(false);
            pDialog.show();
        }
 
        /**
         * getting All products from url
         * */
        protected String doInBackground(String... args) {
            // Building Parameters
            List<NameValuePair> params = new ArrayList<NameValuePair>();
            // getting JSON string from URL
            JSONObject json = jParser.makeHttpRequest(url_all_products, "GET", params);
 
            // Check your log cat for JSON reponse
            Log.d("All Products: ", json.toString());
 
            try {
                // Checking for SUCCESS TAG
                int success = json.getInt(TAG_SUCCESS);
 
                if (success == 1) {
                    // products found
                    // Getting Array of Products
                    products = json.getJSONArray(TAG_PRODUCTS);
 
                    // looping through All Products
                    for (int i = 0; i < products.length(); i++) {
                        JSONObject c = products.getJSONObject(i);
 
                        // Storing each json item in variable
                        String id = c.getString(TAG_PID);
                        String name = c.getString(TAG_NAME);
 
                        // creating new HashMap
                        HashMap<String, String> map = new HashMap<String, String>();
 
                        // adding each child node to HashMap key => value
                        map.put(TAG_PID, id);
                        map.put(TAG_NAME, name);
 
                        // adding HashList to ArrayList
                        productsList.add(map);
                    }
                } else {
                    // no products found
                    // Launch Add New product Activity
                    Intent i = new Intent(getApplicationContext(),
                            NewProductActivity.class);
                    // Closing all previous activities
                    i.addFlags(Intent.FLAG_ACTIVITY_CLEAR_TOP);
                    startActivity(i);
                }
            } catch (JSONException e) {
                e.printStackTrace();
            }
 
            return null;
        }
 
        /**
         * After completing background task Dismiss the progress dialog
         * **/
        protected void onPostExecute(String file_url) {
            // dismiss the dialog after getting all products
            pDialog.dismiss();
            // updating UI from Background Thread
            runOnUiThread(new Runnable() {
                public void run() {
                    /**
                     * Updating parsed JSON data into ListView
                     * */
                    ListAdapter adapter = new SimpleAdapter(
                            AllProductsActivity.this, productsList,
                            R.layout.list_item, new String[] { TAG_PID,
                                    TAG_NAME},
                            new int[] { R.id.pid, R.id.name });
                    // updating listview
                    setListAdapter(adapter);
                }
            });
 
        }
 
    }
}
 
Adding a New Product (Write)
7. Create a new view and acivity to add a new product into mysql database. Create a simple form which contains EditText for product name, price and description.
Create a new xml file and name it as add_product.xml and paste the following code to create a simple form.
add_product.xml
add_product.xml
<?xml version="1.0" encoding="utf-8"?>
<LinearLayout xmlns:android="http://schemas.android.com/apk/res/android"
    android:layout_width="match_parent"
    android:layout_height="match_parent"
    android:orientation="vertical" >
 
    <!-- Name Label -->
    <TextView android:layout_width="fill_parent"
        android:layout_height="wrap_content"
        android:text="Product Name"
        android:paddingLeft="10dip"
        android:paddingRight="10dip"
        android:paddingTop="10dip"
        android:textSize="17dip"/>
 
    <!-- Input Name -->
    <EditText android:id="@+id/inputName"
        android:layout_width="fill_parent"
        android:layout_height="wrap_content"
        android:layout_margin="5dip"
        android:layout_marginBottom="15dip"
        android:singleLine="true"/>
 
    <!-- Price Label -->
    <TextView android:layout_width="fill_parent"
        android:layout_height="wrap_content"
        android:text="Price"
        android:paddingLeft="10dip"
        android:paddingRight="10dip"
        android:paddingTop="10dip"
        android:textSize="17dip"/>
 
    <!-- Input Price -->
    <EditText android:id="@+id/inputPrice"
        android:layout_width="fill_parent"
        android:layout_height="wrap_content"
        android:layout_margin="5dip"
        android:layout_marginBottom="15dip"
        android:singleLine="true"
        android:inputType="numberDecimal"/>
 
    <!-- Description Label -->
    <TextView android:layout_width="fill_parent"
        android:layout_height="wrap_content"
        android:text="Description"
        android:paddingLeft="10dip"
        android:paddingRight="10dip"
        android:paddingTop="10dip"
        android:textSize="17dip"/>
 
    <!-- Input description -->
    <EditText android:id="@+id/inputDesc"
        android:layout_width="fill_parent"
        android:layout_height="wrap_content"
        android:layout_margin="5dip"
        android:layout_marginBottom="15dip"
        android:lines="4"
        android:gravity="top"/>
 
    <!-- Button Create Product -->
    <Button android:id="@+id/btnCreateProduct"
        android:layout_width="fill_parent"
        android:layout_height="wrap_content"
        android:text="Create Product"/>
 
</LinearLayout>
 
8. Now create new Activity to insert a new product into mysql database. Create a class file and name it as NewProductActivity.java and type the following code. In the following code
-> First new product data is read from the EditText form and formatted into a basic params.
-> A request is made to create_product.php to create a new product through HTTP post.
-> After getting json response from create_product.php, If success bit is 1 then list view is refreshed with newly added product.
NewProductActivity.java
package suhan.gorya.makersofandroid;
 
import java.util.ArrayList;
import java.util.List;
 
import org.apache.http.NameValuePair;
import org.apache.http.message.BasicNameValuePair;
import org.json.JSONException;
import org.json.JSONObject;
 
import android.app.Activity;
import android.app.ProgressDialog;
import android.content.Intent;
import android.os.AsyncTask;
import android.os.Bundle;
import android.util.Log;
import android.view.View;
import android.widget.Button;
import android.widget.EditText;
 
public class NewProductActivity extends Activity {
 
    // Progress Dialog
    private ProgressDialog pDialog;
 
    JSONParser jsonParser = new JSONParser();
    EditText inputName;
    EditText inputPrice;
    EditText inputDesc;
 
    // url to create new product
    private static String url_create_product = "http://suhan.gorya/makersofandroid/create_product.php";
 
    // JSON Node names
    private static final String TAG_SUCCESS = "success";
 
    @Override
    public void onCreate(Bundle savedInstanceState) {
        super.onCreate(savedInstanceState);
        setContentView(R.layout.add_product);
 
        // Edit Text
        inputName = (EditText) findViewById(R.id.inputName);
        inputPrice = (EditText) findViewById(R.id.inputPrice);
        inputDesc = (EditText) findViewById(R.id.inputDesc);
 
        // Create button
        Button btnCreateProduct = (Button) findViewById(R.id.btnCreateProduct);
 
        // button click event
        btnCreateProduct.setOnClickListener(new View.OnClickListener() {
 
            @Override
            public void onClick(View view) {
                // creating new product in background thread
                new CreateNewProduct().execute();
            }
        });
    }
 
    /**
     * Background Async Task to Create new product
     * */
    class CreateNewProduct extends AsyncTask<String, String, String> {
 
        /**
         * Before starting background thread Show Progress Dialog
         * */
        @Override
        protected void onPreExecute() {
            super.onPreExecute();
            pDialog = new ProgressDialog(NewProductActivity.this);
            pDialog.setMessage("Creating Product..");
            pDialog.setIndeterminate(false);
            pDialog.setCancelable(true);
            pDialog.show();
        }
 
        /**
         * Creating product
         * */
        protected String doInBackground(String... args) {
            String name = inputName.getText().toString();
            String price = inputPrice.getText().toString();
            String description = inputDesc.getText().toString();
 
            // Building Parameters
            List<NameValuePair> params = new ArrayList<NameValuePair>();
            params.add(new BasicNameValuePair("name", name));
            params.add(new BasicNameValuePair("price", price));
            params.add(new BasicNameValuePair("description", description));
 
            // getting JSON Object
            // Note that create product url accepts POST method
            JSONObject json = jsonParser.makeHttpRequest(url_create_product,
                    "POST", params);
 
            // check log cat fro response
            Log.d("Create Response", json.toString());
 
            // check for success tag
            try {
                int success = json.getInt(TAG_SUCCESS);
 
                if (success == 1) {
                    // successfully created product
                    Intent i = new Intent(getApplicationContext(), AllProductsActivity.class);
                    startActivity(i);
 
                    // closing this screen
                    finish();
                } else {
                    // failed to create product
                }
            } catch (JSONException e) {
                e.printStackTrace();
            }
 
            return null;
        }
 
        /**
         * After completing background task Dismiss the progress dialog
         * **/
        protected void onPostExecute(String file_url) {
            // dismiss the dialog once done
            pDialog.dismiss();
        }
 
    }
}

Reading, Updating and Deleting a Single Product

9. If you notice the AllProductsActivity.java, In listview i am launching EditProductAcivity.java once a single list item is selected. So create xml file called edit_product.xml and create a form which is same as create_product.xml.
edit_product.xml
edit_product.xml
<?xml version="1.0" encoding="utf-8"?>
<LinearLayout xmlns:android="http://schemas.android.com/apk/res/android"
    android:layout_width="match_parent"
    android:layout_height="match_parent"
    android:orientation="vertical" >
 
    <!-- Name Label -->
    <TextView android:layout_width="fill_parent"
        android:layout_height="wrap_content"
        android:text="Product Name"
        android:paddingLeft="10dip"
        android:paddingRight="10dip"
        android:paddingTop="10dip"
        android:textSize="17dip"/>
 
    <!-- Input Name -->
    <EditText android:id="@+id/inputName"
        android:layout_width="fill_parent"
        android:layout_height="wrap_content"
        android:layout_margin="5dip"
        android:layout_marginBottom="15dip"
        android:singleLine="true"/>
 
    <!-- Price Label -->
    <TextView android:layout_width="fill_parent"
        android:layout_height="wrap_content"
        android:text="Price"
        android:paddingLeft="10dip"
        android:paddingRight="10dip"
        android:paddingTop="10dip"
        android:textSize="17dip"/>
 
    <!-- Input Price -->
    <EditText android:id="@+id/inputPrice"
        android:layout_width="fill_parent"
        android:layout_height="wrap_content"
        android:layout_margin="5dip"
        android:layout_marginBottom="15dip"
        android:singleLine="true"
        android:inputType="numberDecimal"/>
 
    <!-- Description Label -->
    <TextView android:layout_width="fill_parent"
        android:layout_height="wrap_content"
        android:text="Description"
        android:paddingLeft="10dip"
        android:paddingRight="10dip"
        android:paddingTop="10dip"
        android:textSize="17dip"/>
 
    <!-- Input description -->
    <EditText android:id="@+id/inputDesc"
        android:layout_width="fill_parent"
        android:layout_height="wrap_content"
        android:layout_margin="5dip"
        android:layout_marginBottom="15dip"
        android:lines="4"
        android:gravity="top"/>
 
    <LinearLayout android:layout_width="fill_parent"
        android:layout_height="wrap_content"
        android:orientation="horizontal">
        <!-- Button Create Product -->
    <Button android:id="@+id/btnSave"
        android:layout_width="fill_parent"
        android:layout_height="wrap_content"
        android:text="Save Changes"
        android:layout_weight="1"/>
 
    <!-- Button Create Product -->
    <Button android:id="@+id/btnDelete"
        android:layout_width="fill_parent"
        android:layout_height="wrap_content"
        android:text="Delete"
        android:layout_weight="1"/>
    </LinearLayout>
 
</LinearLayout>
10. Create a class file for edit_product.xml and name it as EditProductActivity.java and fill it with following code. In the following code
-> First product id (pid) is read from the intent which is sent from listview.
-> A request is made to get_product_details.php and after getting product details in json format, I parsed the json and displayed in EditText.
-> After displaying product data in the form if user clicks on Save Changes Button, another HTTP request is made to update_product.php to store updated product data.
-> If the user selected Delete Product Button, HTTP request is made to delete_product.php and product is deleted from mysql database, and listview is refreshed with new product list.
EditProductActivity.java
package suhan.gorya.makersofandroid;
 
import java.util.ArrayList;
import java.util.List;
 
import org.apache.http.NameValuePair;
import org.apache.http.message.BasicNameValuePair;
import org.json.JSONArray;
import org.json.JSONException;
import org.json.JSONObject;
 
import android.app.Activity;
import android.app.ProgressDialog;
import android.content.Intent;
import android.os.AsyncTask;
import android.os.Bundle;
import android.util.Log;
import android.view.View;
import android.widget.Button;
import android.widget.EditText;
 
public class EditProductActivity extends Activity {
 
    EditText txtName;
    EditText txtPrice;
    EditText txtDesc;
    EditText txtCreatedAt;
    Button btnSave;
    Button btnDelete;
 
    String pid;
 
    // Progress Dialog
    private ProgressDialog pDialog;
 
    // JSON parser class
    JSONParser jsonParser = new JSONParser();
 
    // single product url
    private static final String url_product_detials = "http://suhan.gorya/makersofandroid/get_product_details.php";
 
    // url to update product
    private static final String url_update_product = "http://suhan.gorya/makersofandroid/update_product.php";
 
    // url to delete product
    private static final String url_delete_product = "http://suhan.gorya/makersofandroid/delete_product.php";
 
    // JSON Node names
    private static final String TAG_SUCCESS = "success";
    private static final String TAG_PRODUCT = "product";
    private static final String TAG_PID = "pid";
    private static final String TAG_NAME = "name";
    private static final String TAG_PRICE = "price";
    private static final String TAG_DESCRIPTION = "description";
 
    @Override
    public void onCreate(Bundle savedInstanceState) {
        super.onCreate(savedInstanceState);
        setContentView(R.layout.edit_product);
 
        // save button
        btnSave = (Button) findViewById(R.id.btnSave);
        btnDelete = (Button) findViewById(R.id.btnDelete);
 
        // getting product details from intent
        Intent i = getIntent();
 
        // getting product id (pid) from intent
        pid = i.getStringExtra(TAG_PID);
 
        // Getting complete product details in background thread
        new GetProductDetails().execute();
 
        // save button click event
        btnSave.setOnClickListener(new View.OnClickListener() {
 
            @Override
            public void onClick(View arg0) {
                // starting background task to update product
                new SaveProductDetails().execute();
            }
        });
 
        // Delete button click event
        btnDelete.setOnClickListener(new View.OnClickListener() {
 
            @Override
            public void onClick(View arg0) {
                // deleting product in background thread
                new DeleteProduct().execute();
            }
        });
 
    }
 
    /**
     * Background Async Task to Get complete product details
     * */
    class GetProductDetails extends AsyncTask<String, String, String> {
 
        /**
         * Before starting background thread Show Progress Dialog
         * */
        @Override
        protected void onPreExecute() {
            super.onPreExecute();
            pDialog = new ProgressDialog(EditProductActivity.this);
            pDialog.setMessage("Loading product details. Please wait...");
            pDialog.setIndeterminate(false);
            pDialog.setCancelable(true);
            pDialog.show();
        }
 
        /**
         * Getting product details in background thread
         * */
        protected String doInBackground(String... params) {
 
            // updating UI from Background Thread
            runOnUiThread(new Runnable() {
                public void run() {
                    // Check for success tag
                    int success;
                    try {
                        // Building Parameters
                        List<NameValuePair> params = new ArrayList<NameValuePair>();
                        params.add(new BasicNameValuePair("pid", pid));
 
                        // getting product details by making HTTP request
                        // Note that product details url will use GET request
                        JSONObject json = jsonParser.makeHttpRequest(
                                url_product_detials, "GET", params);
 
                        // check your log for json response
                        Log.d("Single Product Details", json.toString());
 
                        // json success tag
                        success = json.getInt(TAG_SUCCESS);
                        if (success == 1) {
                            // successfully received product details
                            JSONArray productObj = json
                                    .getJSONArray(TAG_PRODUCT); // JSON Array
 
                            // get first product object from JSON Array
                            JSONObject product = productObj.getJSONObject(0);
 
                            // product with this pid found
                            // Edit Text
                            txtName = (EditText) findViewById(R.id.inputName);
                            txtPrice = (EditText) findViewById(R.id.inputPrice);
                            txtDesc = (EditText) findViewById(R.id.inputDesc);
 
                            // display product data in EditText
                            txtName.setText(product.getString(TAG_NAME));
                            txtPrice.setText(product.getString(TAG_PRICE));
                            txtDesc.setText(product.getString(TAG_DESCRIPTION));
 
                        }else{
                            // product with pid not found
                        }
                    } catch (JSONException e) {
                        e.printStackTrace();
                    }
                }
            });
 
            return null;
        }
 
        /**
         * After completing background task Dismiss the progress dialog
         * **/
        protected void onPostExecute(String file_url) {
            // dismiss the dialog once got all details
            pDialog.dismiss();
        }
    }
 
    /**
     * Background Async Task to  Save product Details
     * */
    class SaveProductDetails extends AsyncTask<String, String, String> {
 
        /**
         * Before starting background thread Show Progress Dialog
         * */
        @Override
        protected void onPreExecute() {
            super.onPreExecute();
            pDialog = new ProgressDialog(EditProductActivity.this);
            pDialog.setMessage("Saving product ...");
            pDialog.setIndeterminate(false);
            pDialog.setCancelable(true);
            pDialog.show();
        }
 
        /**
         * Saving product
         * */
        protected String doInBackground(String... args) {
 
            // getting updated data from EditTexts
            String name = txtName.getText().toString();
            String price = txtPrice.getText().toString();
            String description = txtDesc.getText().toString();
 
            // Building Parameters
            List<NameValuePair> params = new ArrayList<NameValuePair>();
            params.add(new BasicNameValuePair(TAG_PID, pid));
            params.add(new BasicNameValuePair(TAG_NAME, name));
            params.add(new BasicNameValuePair(TAG_PRICE, price));
            params.add(new BasicNameValuePair(TAG_DESCRIPTION, description));
 
            // sending modified data through http request
            // Notice that update product url accepts POST method
            JSONObject json = jsonParser.makeHttpRequest(url_update_product,
                    "POST", params);
 
            // check json success tag
            try {
                int success = json.getInt(TAG_SUCCESS);
 
                if (success == 1) {
                    // successfully updated
                    Intent i = getIntent();
                    // send result code 100 to notify about product update
                    setResult(100, i);
                    finish();
                } else {
                    // failed to update product
                }
            } catch (JSONException e) {
                e.printStackTrace();
            }
 
            return null;
        }
 
        /**
         * After completing background task Dismiss the progress dialog
         * **/
        protected void onPostExecute(String file_url) {
            // dismiss the dialog once product uupdated
            pDialog.dismiss();
        }
    }
 
    /*****************************************************************
     * Background Async Task to Delete Product
     * */
    class DeleteProduct extends AsyncTask<String, String, String> {
 
        /**
         * Before starting background thread Show Progress Dialog
         * */
        @Override
        protected void onPreExecute() {
            super.onPreExecute();
            pDialog = new ProgressDialog(EditProductActivity.this);
            pDialog.setMessage("Deleting Product...");
            pDialog.setIndeterminate(false);
            pDialog.setCancelable(true);
            pDialog.show();
        }
 
        /**
         * Deleting product
         * */
        protected String doInBackground(String... args) {
 
            // Check for success tag
            int success;
            try {
                // Building Parameters
                List<NameValuePair> params = new ArrayList<NameValuePair>();
                params.add(new BasicNameValuePair("pid", pid));
 
                // getting product details by making HTTP request
                JSONObject json = jsonParser.makeHttpRequest(
                        url_delete_product, "POST", params);
 
                // check your log for json response
                Log.d("Delete Product", json.toString());
 
                // json success tag
                success = json.getInt(TAG_SUCCESS);
                if (success == 1) {
                    // product successfully deleted
                    // notify previous activity by sending code 100
                    Intent i = getIntent();
                    // send result code 100 to notify about product deletion
                    setResult(100, i);
                    finish();
                }
            } catch (JSONException e) {
                e.printStackTrace();
            }
 
            return null;
        }
 
        /**
         * After completing background task Dismiss the progress dialog
         * **/
        protected void onPostExecute(String file_url) {
            // dismiss the dialog once product deleted
            pDialog.dismiss();
 
        }
 
    }
}


JSON Parser Class

I used a JSON Parser class to get JSON from URL. This class supports two http request methods GET and POST to get json from url.
JSONParser.java
package suhan.gorya.makersofandroid;
 
import java.io.BufferedReader;
import java.io.IOException;
import java.io.InputStream;
import java.io.InputStreamReader;
import java.io.UnsupportedEncodingException;
import java.util.List;
 
import org.apache.http.HttpEntity;
import org.apache.http.HttpResponse;
import org.apache.http.NameValuePair;
import org.apache.http.client.ClientProtocolException;
import org.apache.http.client.entity.UrlEncodedFormEntity;
import org.apache.http.client.methods.HttpGet;
import org.apache.http.client.methods.HttpPost;
import org.apache.http.client.utils.URLEncodedUtils;
import org.apache.http.impl.client.DefaultHttpClient;
import org.json.JSONException;
import org.json.JSONObject;
 
import android.util.Log;
 
public class JSONParser {
 
    static InputStream is = null;
    static JSONObject jObj = null;
    static String json = "";
 
    // constructor
    public JSONParser() {
 
    }
 
    // function get json from url
    // by making HTTP POST or GET mehtod
    public JSONObject makeHttpRequest(String url, String method,
            List<NameValuePair> params) {
 
        // Making HTTP request
        try {
 
            // check for request method
            if(method == "POST"){
                // request method is POST
                // defaultHttpClient
                DefaultHttpClient httpClient = new DefaultHttpClient();
                HttpPost httpPost = new HttpPost(url);
                httpPost.setEntity(new UrlEncodedFormEntity(params));
 
                HttpResponse httpResponse = httpClient.execute(httpPost);
                HttpEntity httpEntity = httpResponse.getEntity();
                is = httpEntity.getContent();
 
            }else if(method == "GET"){
                // request method is GET
                DefaultHttpClient httpClient = new DefaultHttpClient();
                String paramString = URLEncodedUtils.format(params, "utf-8");
                url += "?" + paramString;
                HttpGet httpGet = new HttpGet(url);
 
                HttpResponse httpResponse = httpClient.execute(httpGet);
                HttpEntity httpEntity = httpResponse.getEntity();
                is = httpEntity.getContent();
            }          
 
        } catch (UnsupportedEncodingException e) {
            e.printStackTrace();
        } catch (ClientProtocolException e) {
            e.printStackTrace();
        } catch (IOException e) {
            e.printStackTrace();
        }
 
        try {
            BufferedReader reader = new BufferedReader(new InputStreamReader(
                    is, "iso-8859-1"), 8);
            StringBuilder sb = new StringBuilder();
            String line = null;
            while ((line = reader.readLine()) != null) {
                sb.append(line + "\n");
            }
            is.close();
            json = sb.toString();
        } catch (Exception e) {
            Log.e("Buffer Error", "Error converting result " + e.toString());
        }
 
        // try parse the string to a JSON object
        try {
            jObj = new JSONObject(json);
        } catch (JSONException e) {
            Log.e("JSON Parser", "Error parsing data " + e.toString());
        }
 
        // return JSON String
        return jObj;
 
    }
}


Hey, Developers, its like new thing you learn today, if you have any  quires related this, please contact me,
I`ll provide you my best knowledge to overcome all the difficulties during coding.
share and like, if you like this.
 
Next I`ll post full source code of android app having database on server connection.

Here is Suhan Gorya.